Rails Kitchen

It's a place to write on stuff I learned recently.

A GraphQL Server Implementation - Ruby on Rails

| Comments

GraphQL is a query language for APIs developed by the Facebook team. This language gives clients the power to ask for exactly what they need and nothing more makes it easier to evolve APIs over time and enables powerful developer tools. Facebook open sourced it in 2015.

video courtesy: graphql.org

A GraphQL request can be either a query (read operation) or a mutation (write operation). For both cases, the request is a simple string that a GraphQL service can interpret, execute, and resolve with data in a specified format.

Main features of GraphQL are:

Retrieve only the data your client needs in a single request - No over-fetching:

Send a GraphQL query to your API with the fields you want to fetch and get only that set of fields in return. Apps using GraphQL are fast and stable because they control the data they get, not the server.

Get many resources in a single round-trip:

We can create queries with a different combination of datasets which will avoid multiple requests to fetch required data, thereby eliminating overheads.

Describe what’s possible with a type system:

GraphQL APIs have a single endpoint and it organizes API with requesting types and fields.

Evolve your API without versions - maintainability:

Add new fields and types to your GraphQL API without impacting existing queries. Aging fields can be deprecated and hidden from tools. By using a single evolving version, GraphQL APIs give apps continuous access to new features and encourage cleaner, more maintainable server code.

GraphQL Queries:

Here’s an example of a GraphQL query that a client can use to ask a server about the name and email of user #1:

1
2
3
4
5
6
7
{
  user(id: 1) {
    firstName,
    lastName,
    email
  }
}
Here’s a possible JSON response for that query:
1
2
3
4
5
6
7
8
9
{
  "data": {
    "user": {
      "firstName": "Shaiju",
      "lastName": "E",
      "email": "eshaiju@gmail.com"
     }
   }
}
GraphQL server implementation in Ruby On Rails Application

Here we are assuming, we have an existing ROR application with model Article and fields title and body.

You can install graphql from RubyGems by adding to your application’s Gemfile:
Gemfile
1
2
3
# Gemfile
gem "graphql"
gem 'graphiql-rails', group: :development
Then, run bundle install.

Now you can get started with a few GraphQL generators:
1
rails g graphql:install
This will:
  • Set up a folder structure in app/graphql/
  • Add schema definition
  • Add a query type definition
  • Add a route and controller for executing queries
  • After installing you can see your new schema by:
    1
    2
    3
    
    bundle install
    rails server
    open localhost:3000/graphiql
    After this, you can build a GraphQL server by hand or GraphQL generators

    Here I am building by hand.

    Define some types: Add article_type.rb in ‘types’ folder which will define ArticleType
    app/graphql/types/article_type.rb
    1
    2
    3
    4
    5
    6
    7
    
    ArticleType = GraphQL::ObjectType.define do
      name "Article"
      field :id, types.Int
      field :title, types.String
      field :body, types.String
      field :comments, types[CommentType]
    end
    
    Now we need to build schema, which is what we use to query
    app/graphql/types/query_type.rb
    1
    2
    3
    4
    5
    6
    7
    8
    9
    10
    11
    
    QueryType = GraphQL::ObjectType.define do
      name "Query"
      description "The query root of this schema"
    
      field :article do
        type ArticleType
        argument :id, !types.ID
        description "Find a Article by ID"
        resolve ->(obj, args, ctx) { Article.find_by_id(args["id"]) }
      end
    end
    
    This will query article by accepting ID as argument Then, build a schema with QueryType as the query entry point: Add following in graphql_ruby_sample_schema.rb
    app/graphql/graphql_ruby_sample_schema.rb
    1
    2
    3
    4
    
    # encoding: utf-8
    GraphqlRubySampleSchema = GraphQL::Schema.define do
      query QueryType
    end
    
    Since, we created new folders we have to tell Rails to autoload paths. Put below code in application.rb to autoload graphql and types folder like so:
    config/application.rb
    1
    2
    
    config.autoload_paths << Rails.root.join('app/graphql')
    config.autoload_paths << Rails.root.join('app/graphql/types')
    
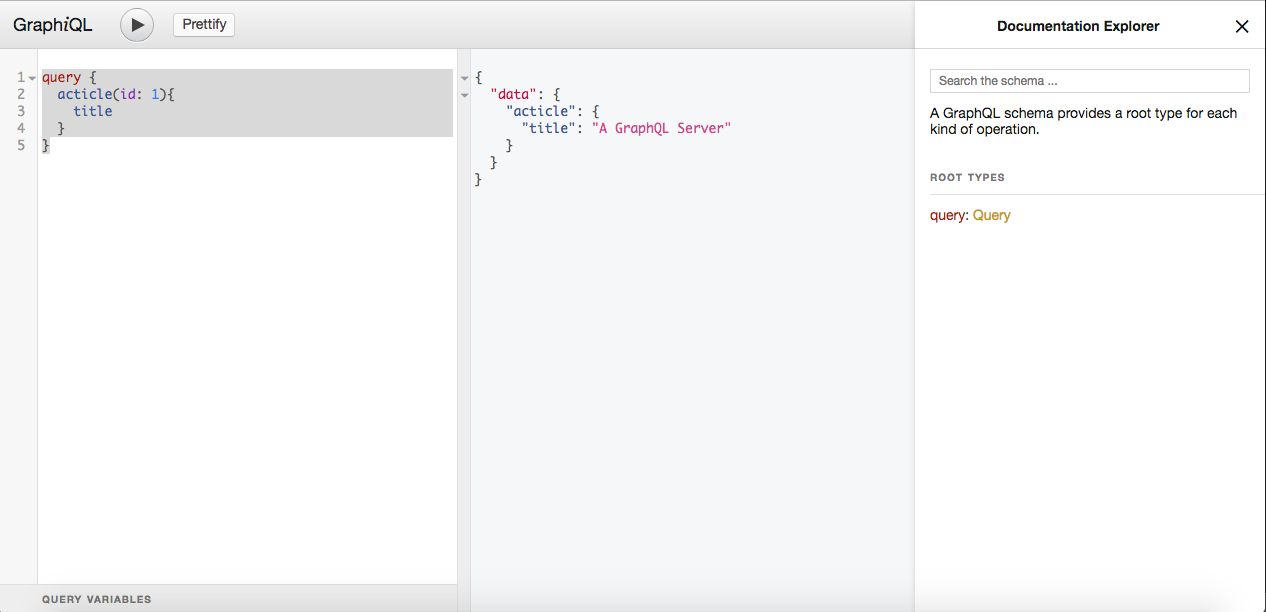
    This schema is ready to serve GraphQL queries!. play around this query in GraphiQL.

    Here’s an example of a GraphQL query that a client can use to ask a server about the title of article #1:
    1
    2
    3
    4
    5
    
    query {
      article(id: 1){
        title
      }
    }
    
    Here’s a possible JSON response for that query:
    1
    2
    3
    4
    5
    6
    7
    
    {
      "data": {
        "article": {
          "title": "A GraphQL Server"
        }
      }
    }
    
    You can execute queries from a query string:
    1
    2
    3
    4
    5
    6
    7
    8
    9
    10
    11
    12
    13
    14
    15
    16
    17
    18
    
    query_string = "
    {
      article(id: 1) {
        id
        title
      }
    }"
    result_hash = GraphqlRubySampleSchema.execute(query_string)
    
    output:
    # {
    #   "data" => {
    #     "article" => {
    #        "id" => 1,
    #        "title" => "A GraphQL Server"
    #     }
    #   }
    # }
    
    You can see sample code here.

Delayed_job_web - a Resque Inspired Interface for Delayed_job

| Comments

delayed_job_web is a gem which will provide the Resque inspired interface for delayed_job. This gem will provide a nice interface for monitor all activities in delayed jobs instead of searching it in the database directly.
Some features:
  • Easily view jobs enqueued, working, pending, and failed.
  • Queue any single job. or all pending jobs, to run immediately.
  • Remove a failed job, or easily remove all failed jobs.
  • Watch delayed_job operation with live ajax polling.
  • Filter delayed_jobs by queue name.
Quick Start For Rails 5 Applications:

Add the dependency to your Gemfile and bundle it.
1
2
3
4
5
6
gem 'delayed_job_web'

# For dependency resolution of 'delayed_job_web' gem
# More info - https://github.com/ejschmitt/delayed_job_web/issues/84
gem 'rack-protection', github: 'sinatra/sinatra'
gem 'sinatra', github: 'sinatra/sinatra'

Add the following route to your application for accessing the interface, and retrying failed jobs.
1
2
3
get '/delayed_job' => DelayedJobWeb, :anchor => false
put '/delayed_job' => DelayedJobWeb, :anchor => false
post '/delayed_job' => DelayedJobWeb, :anchor => false
You can authenticate web interface by adding something like this,
1
2
3
4
5
authenticate :user, ->(u) { u.super_admin? } do
  get '/delayed_job' => DelayedJobWeb, :anchor => false
  put '/delayed_job' => DelayedJobWeb, :anchor => false
  post '/delayed_job' => DelayedJobWeb, :anchor => false
end
now web interface will be available only for super admin login.

Profile API Endpoints Using Rack-mini-profiler

| Comments

rack-mini-profiler is a great tool for fine tuning our Ruby on Rails application. This gem will show all information about the queries in the web page we are loading. By checking this list, we can understand which part of our code takes the longest time and optimize that part of code.


This is very useful to inspect the performance of HTML pages, but it does not provide any default ways to review the performance of API endpoints. After some searching, I found out that, by default, the rack-mini-profiler gem collects the previous JSON call and will show all previous requests in the next loading HTML page. Using this feature we can achieve profiling API endpoints.

Following are the steps that I did to profile API request.

1- Make an API request using Postman or another client.
2- Reload an HTML page, I loaded 404.html page by hitting URL http://localhost:3000/404.html
3- This web page will show all profile information of previous API call.


slide-Active Record Basics

| Comments

In my current company Ruby Software Pvt.Ltd, I gave a session on Active Record Basics to New joiners. The primary goal of this session to give an introduction to active record basics and make them do basic CRUD operation using AR. 
The slides of the session is available below..


Hope you enjoyed my slides.

Rails 5 ‘Belongs_to’ Associations Default to Required True

| Comments

5.0.0.beta2 version is released. One of the changes I noticed is belongs_to associations by default required is true, that means if you create an object by setting foreign key to be nil it will throw a must exist validation error. This change will have some impact if you are migrating an existing rails 4 application in to rails 5 and foreign key is not mandatory in your application.
For example, if your User model has city_id as forign key, then if you create user without adding city_id then rails 5 will throw validation error.
user.rb
1
2
3
class User < ApplicationRecord
  belongs_to :city
end
1
2
3
4
5
6
2.3.0 :003 > user = User.create(name:'Shaiju')
   (0.3ms)  BEGIN
   (0.2ms)  ROLLBACK
 => #<User id: nil, name: "Shaiju", city_id: nil, created_at: nil, updated_at: nil> 
2.3.0 :004 > user.errors
 => #<ActiveModel::Errors:0xa8d9a00 @base=#<User id: nil, name: "Shaiju", city_id: nil, created_at: nil, updated_at: nil>, @messages={:city=>["must exist"]}, @details={:city=>[{:error=>:blank}]}>
If we want to turn of this behavior we can use :optional => true . When set to true, the association will not have its presence validated.
user.rb
1
2
3
class User < ApplicationRecord
  belongs_to :city,optional: true
end
1
2
3
4
5
2.3.0 :001 > user = User.create(name:'Shaiju')
   (0.3ms)  BEGIN
  SQL (25.2ms)  INSERT INTO `users` (`name`, `created_at`, `updated_at`) VALUES ('Shaiju', '2016-02-15 12:25:55', '2016-02-15 12:25:55')
   (81.6ms)  COMMIT
 => #<User id: 1, name: "Shaiju", city_id: nil, created_at: "2016-02-15 12:25:55", updated_at: "2016-02-15 12:25:55">
You can turn off this in entire application by setting Rails.application. config.active_record.belongs_to_required_by_default = false in config/initializers/active_record_belongs_to_required_by_default.rb file.
config/initializers/active_record_belongs_to_required_by_default.rb
1
2
3
4
5
6
7
 # Be sure to restart your server when you modify this file.

# Require `belongs_to` associations by default. This is a new Rails 5.0
# default, so it is introduced as a configuration option to ensure that apps
# made on earlier versions of Rails are not affected when upgrading.
Rails.application.config.active_record.belongs_to_required_by_default = false

APIPI Dumping Examples Into Apipie_examples File

| Comments

Apipie-rails is a DSL and Rails engine for documenting your RESTful API. In older versions of apipi-rails we can dump all our exapmles in to apipie_examples.yml file. From apipie-rails 0.2.0 onwards format of storing examples changed from YAML to JSON: the default location is at doc/apipie_examples.json.

Example:
doc/apipie_examples.json
1
2
3
4
5
6
7
8
9
10
11
12
13
14
15
16
17
18
19
20
21
22
23
24
25
26
27
28
29
30
31
32
33
34
35
36
37
38
39
40
41
42
43
44
45
46
47
48
49
50
51
52
53
54
55
56
57
58
59
60
61
62
63
64
65
66
67
68
69
70
71
72
73
74
75
76
77
78
79
80
81
82
83
84
85
 {
    "channels#index":[
    {
        "verb": "GET",
        "path": "/api/v1/channels",
        "query": null,
        "code": 200,
        "show_in_doc": 1,
        "recorded": false,
        "request_data": null,
        "page": 1,
        "response_data": {
          "channels": [
            {
              "id": 1,
              "name": "Channel 1",
              "thumb_image_path": "/uploads/channel/thumb_image/1/channel1.png",
              "language_name": "Tamil"
            },
            {
              "id": 3,
              "name": "Channel 3",
              "thumb_image_path": "/uploads/channel/thumb_image/3/channel3.png",
              "language_name": "Tamil"
            }
          ],
          "top_channels": [
            {
              "id": 7,
              "channel": {
                "id": 2,
                "name": "Channel 2",
                "thumb_image_path": "/uploads/channel/thumb_image/2/channel2.png",
                "language_name": "Tamil"
              }
            }
          ],
          "channels_count": 2
        }
    }],
    "channels#show": [
      {
        "verb": "GET",
        "path": "/api/v1/channels/:id",
        "query": null,
        "code": 200,
        "show_in_doc": 1,
        "recorded": false,
        "request_data": null,
        "page": 1,
        "response_data": {
          "channel": {
            "id": 1,
            "name": "suraj comedy",
            "language_name": "Malayalam"
          },
          "videos": [
            {
              "id": 4,
              "title": "Suraj Latest Comedy",
              "description": "Malayalam Comedy Stage Show :",
              "video_link": "https://www.youtube.com/watch?v=tGawZvf_UMA",
              "view_count": 0,
              "created_at": "2016-02-15T09:43:14.000Z",
              "thumb_image_path": "/uploads/video/thumb_image/4/080.jpg"
            }
          ],
          "top_videos": [
            {
              "id": 2,
              "video": {
                "id": 1,
                "title": "Suraj-Shaji Latest Comedy",
                "description": "Malayalam Comedy Stage Show : Pashanam Shaji Speaking pashanam shaji mazhavil manorama,Flowers tv Comedy Super Nite",
                "video_link": "https://www.youtube.com/watch?v=tGawZvf_UMQ",
                "view_count": null,
                "created_at": "2016-02-15T07:48:22.000Z",
                "thumb_image_path": nil
              }
            }
          ]
        }
      }]
  }
  

If you want to upgrade existing document in to newer version then The migration should be as easy as running:
1
rake apipie:convert_examples
This rake task will convert existing data from yml format in to json formatand store in doc/apipie_examples.json.

Camaleon CMS - Wordpress Alternative Built in Ruby on Rails 4

| Comments

Camaleon CMS is a free and Open source Content Management System developed on Ruby on Rails 4 which was released 6 months back. This CMS is an alternative to wordpress for Ruby on Rails developers to manage advanced contents easily. Within 6 months of release, this project has 713 stars , 114 forks in github and also have 16 contributors.

Let’s have a look at its features.
Plugins:
This CMS is coming with a collection of plugins by default and we can simply enable it in our site using admin pannel. They have a plugin store which currently contains 14 plugins including Analytics, Ecommerce, Contact form, Post reorder and a few others.
Security:
Camaleon CMS protects your content from common attacks, such as Remote code execution, SQL injections, Advanced sessions security, Cross Site Scripting, Control of abusive requests, Cross-Site Request Forgery.
Nice Design and UX:
Camaleon CMS looks pretty good and modern, comparing to other CMS options available in Ruby on Rails. Camaleon CMS permit you to adapt the CMS to all your needs and not you adapt to the CMS. that is you can create your custom architecture with all attributes that you need for each kind of content.
Site Speed:
Camaleon CMS include a lot of cache strategies to optimize the site access velocity. Cache contents, Cache queries, Manifests (compress and join asset files), Customize your content visualization for Desktop, Mobile and Tablet are some of the strategies used in Camaleon CMS.

Installing Camaleon CMS
You can install Camaleon-CMS with the following steps.
Create your rails project :
1
rails new my_project
Add the gem in your Gemfile :
1
gem ‘camaleon_cms’
Install the gem :
1
bundle install
Install the CMS (This will copy some basic templates and plugins in your project) :
1
rails generate camaleon_cms:install
Install required Gems for CMS and basic plugins
1
bundle install
Create database structure
1
rake db:migrate
Start your server
1
rails server # start your server
Open a browser and navigate to http://localhost:3000 to see the initial setup page.

Create Rails Application From Edge Version – 5.0.0.beta1.1

| Comments

5.0.0.beta1.1 version is released which has some exciting stuffs like Action Cable, API mode, new Rails commands. To test all these new items we need to setup rails application from Edge Version. There are different ways to setup a rails project using Edge version. In this post I am explaining how I setup a project in Rails 5.0.0.beta.
First We need to create an application folder with the name of the application and add a Gemfile.
1
2
3
mkdir app_name
cd app_name
touch Gemfile
and add the following into the Gemfile
1
2
3
4
5
6
source 'https://rubygems.org'
ruby '2.2.3'

gem 'rails', :github => 'rails/rails'
gem 'arel', :github => 'rails/arel'
gem 'rack', :github =>  'rack/rack'
Rails 5 requires Ruby 2.2.2 or greater. Setup the Ruby Environment to Ruby 2.2 or greater then do the bundle install
1
2
rvm use 2.2.3
bundle install
Generate Rails application using the following code
1
bundle exec rails new . --force --dev
The –force flag will allow Rails to overwrite our Gemfile, and the –dev flag tells Rails to point to the edge version of Rails that we just bundled.
That’s it, now we will have a brand new Rails application with Edge Version.

Travis Ci Integration - Step by Step Tutorial

| Comments

Travis-CI is an open source, free and hosted continuous integration service that could build and run the unit tests for you, on every commit to a GitHub repository. It supports projects in a multitude of languages. The service allows you to configure steps that would be run before, after and during the build and test process, with just one YAMLfile (named .travis.yml) in the root of your repo. Apart from running the many unit tests in the project and letting you know how your latest check-in affected the health of the project, the Travis-CI service could also do custom build tasks like a post-build deployment. Testing your open source project is free. To integrate Travis Ci in a private project we have to purchase suitable plan .
Features created to help projects and teams
  • Watch your tests as they run
  • Keep your config with your code
  • Slack, HipChat, Emails and more
  • A clean VM for every build
  • Run your tests in parallel
  • Linux and Mac (and iOS) supported
  • Great API and command line tool
To get started with Travis CI:
  1. Sign into Travis CI with your GitHub account, accepting the GitHub access permissions confirmation.
  2. Once you’re signed in, and Travis synchronized your repositories from GitHub, go to your profile page and enable Travis CI builds for your repository. (Note: You can only enable Travis CI builds for repositories you have admin access to.)
  3. Add .travis.yml to your project’s root folder
  4. Add settings to .travis.yml
  5. 1
    2
    3
    4
    5
    6
    7
    8
    9
    10
    11
    12
    
    language: ruby
    rvm:
      - "2.2.0"
    env:
      - DB=mysql
    script: 
      - RAILS_ENV=test bundle exec rake db:migrate --trace
      - bundle exec rake db:test:prepare
      - bundle exec rspec spec/
    before_script:
      - mysql -e 'create database myapp_test'
    bundler_args: --binstubs=./bundler_stubs
  6. Setup Database MySQL on Travis CI is started on boot, binds to 127.0.0.1 and requires authentication. You can connect using the username “travis” or “root” and a blank password. Note that the “travis” user does not have full MySQL privileges that the “root” user does.
  7. config/database.yml example for Ruby projects using ActiveRecord:
    1
    2
    3
    4
    5
    
    test:
        adapter: mysql2
        database: myapp_test
        username: travis
        encoding: utf8
  8. Commit this to GitHub (Note: Travis only runs a build on the commits you push after adding the repository to Travis.)
  9. Wait for Travis CI to run a build on your repository, check the build status. (Travis CI sends you an email when build fails)
Example of Travis Ci builds can be seen here.